Use the General Ledger Interface feature to export DrCloudEHR billing and payment data for a selected accounting period to comma-separated value (.csv) files that you can import into your general ledger system.
The feature exports billing and payment data associated with crosswalk entries defined in DrCloudEHR. A crosswalk contains the information needed to export data to accounts in your general ledger system. You can configure the application to create crosswalk entries for any combination of the following:
- Treatment facilities
- Insurance providers
- Service codes
After you create a crosswalk, billing and payment data for the selected facility, insurance provider or service code is associated with the corresponding accounts when you export the data.
This topic contains the following sections:
Configure General Ledger Account Numbers
Before you use the General Ledger Interface feature, define the general ledger account number for each facility, insurance provider, and service code for which you want to export data.
Each account number should contain the same number of characters.
Configure the Ledger Account Number for a Facility
- Click the Practice tab at the top of the page.
- Click the Administrative tab in the left-hand navigation bar, and then click Facilities.
- Click the facility name in the table.
- Click the Additional Info tab.
- Enter a value in the Ledger Account Number field.
Configure the Ledger Account Number for an Insurance Provider
- Click the Practice tab at the top of the page.
- Click the Administrative tab in the left-hand navigation bar, and then click Practice.
- Click an insurance company in the table.
- Enter a value in the Ledger Account Number field.
Configure the Ledger Account Number for a Service Code
- Click the Practice tab at the top of the page.
- Click the Administrative tab in the left-hand navigation bar, and then click Services.
- Select a code type, such as CPT4, and then click Search. The existing codes load in the table below.
- Click Edit for a service code in the table.
- Enter a value in the Ledger Account Number field.
Configure the General Ledger Interface Feature
Define the format for crosswalk entries created in DrCloudEHR. The format you define applies to all crosswalks that you create.
You can select more than one entity to include in crosswalks. For example, you can configure the application to create crosswalks that combine insurance providers and facilities. When you create a new crosswalk, you select the corresponding insurance provider and facility to include. The application then adds the account numbers for each selected facility and insurance provider to the crosswalk.
- Click the Billing tab at the top of the page.
- Click the Account Ledger tab in the left-hand navigation bar.
- Click the Crosswalk tab. The GL Crosswalk page appears.
- Click the GL Settings button, and then enter your eSignature password.
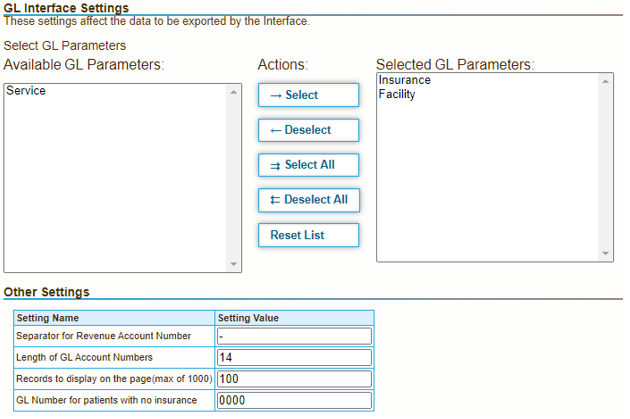
- Select the entities – Facility, Insurance, or Service - for which you want to create crosswalk entries in the Select GL Parameters section.
Define the format of accounts included in crosswalks in the Other Settings section. The following table describes the properties you set:
Separator for Revenue Account Number
The separator to use when the application generates account numbers using the Ledger Account Number for each selected entity. For example:
<Insurance Account Number>-<Facility Account Number>
Length of GL Account Numbers The maximum number of characters that you can include in account numbers. All characters in the string, including the separator, are included in the length.
Records to display on the page The maximum number of crosswalk entries to display in the Export Data window.
GL Number for patients with no insurance The value to display for patients that do not have insurance. The value is appended to Revenue and Cash account numbers in the crosswalk.
You must specify a numeric value.
The following image shows the settings defined to create crosswalk entries that include the combination of Insurance and Facility. Account numbers for patients without insurance will include 0000.
- Click Save to save the crosswalk settings.
Create Crosswalk Entries
Create a crosswalk entry for each facility, insurance provider, or service code for which you export data.
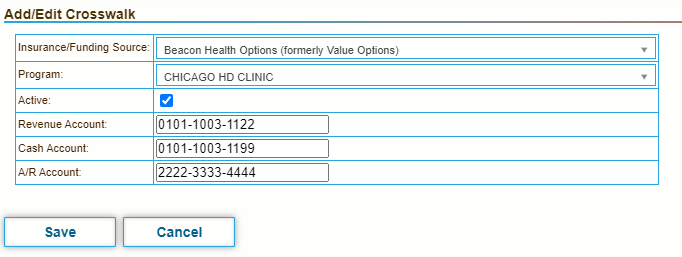
- Click Add to create a new crosswalk entry.
- Select a value for the facility, insurance provider or service code.
When you select more than one entity, the application concatenates the general ledger account number for each entity into a Revenue Account number and a Cash Account number in the crosswalk.To differentiate between the Revenue and Cash accounts, you might want to change one or more values in one of the account number fields. - Enter an accounts receivable account number in the A/R Account field.
In the following image, the Ledger Account Numbers for the Insurance and Facility (Program) entities are concatenated into Revenue Account and Cash Account numbers. The last two digits in the Cash Account number are changed to allow you to differentiate between the accounts.
- Click Save.
Close the Accounting Period
When you export data, you select the month and year for the accounting period for which you want to export data. Close the accounting period before you export data to ensure that you do not export unwanted transactions to your general ledger.
- Close the accounting period for which you want to export data. Click the Billing tab at the top of the page. The Accounting Period tab appears in the left-hand navigation bar.
- Click the Accounting Periods tab.
- Select the year for which you want to view data in the Accounting Periods page.
- Click Edit in the Action column, and then change the status to Closed.
- Click Save.
Export the Data
After you create your crosswalk entries, you can export billing and payment data associated with each crosswalk.
The application generates a .zip file containing the exported data in two comma-separated value (.csv) files named billing_data.csv and cash_data.csv. You can import the data from these files into your general ledger system.
- Click the Account Ledger tab, and then click Export.
- Select the month and year that correspond to the accounting period for which you want to export data.
- Click Search to load the data for the selected accounting period.
The following image shows a summary of the export data for each crosswalk. For each claim or payment included in the data, the GL Account column contains two accounts. The account number in the first row is the Revenue or Cash account number as defined in the crosswalk. The second row contains the A/R account number.
- Enter a title for the export.
- Click Export. The application generates a .zip file containing two .csv files.
The Export button is disabled if the data contains entries without general ledger account numbers. Click the Download Records with missing GL A/C button to download the entries that contain missing account numbers.
Overview
Content Tools
Activity