Page History
...
When an insurance payer sends you payment for a claim submitted electronically, the insurance payers generates an electronic remittance advice (ERA) file containing details on payments and adjustments. DrCloudEHR scans the file and posts the payment and adjustment details to the DrCloudEHR payment system.
Automatically Process Electronic Remittance Advice (ERA) Payments
If an insurance payer processes claims through a clearinghouse, the company sends ERA files to the clearinghouse. DrCloudEHR downloads the ERA files from the clearinghouse on a scheduled basis. The application scans each file and automatically posts the payment and adjustment details to the DrCloudEHR payment system. No additional action is required on your part.
...
Due to the amount of data being processed, the ERA process runs in the background, so that you can continue to use DrCloudEHR while the process runs. The application sends you an email when the process completes, and generates a pa report in .html format that provides details on the process results.
Note: You must configure your web browser to allow popup windows to post and process ERA files.
- Click the Billing tab tab.
- Click Payments in the left-hand navigation menu.
Click the ERA Posting tab in the Payments/Refunds page.
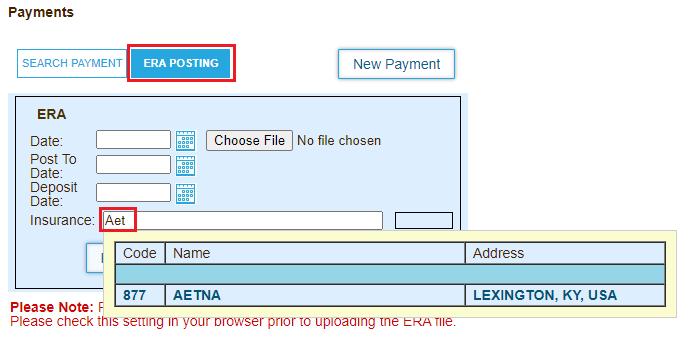
- Start typing the name of the insurance company, and then select the company.
- Click Choose File to upload the ERA file.
- Click Process ERA. A pop up window listing the check numbers in the file displays.

- Select the checkbox for each check you want to include.
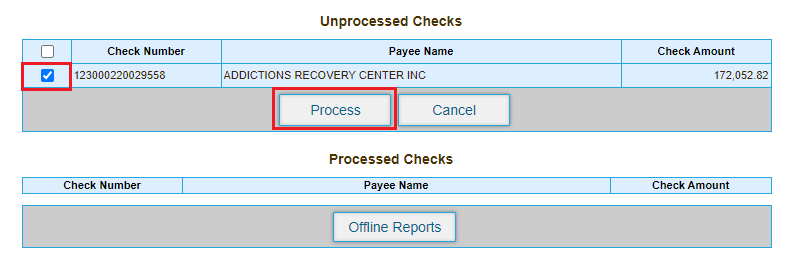
- Click Process. The ERA process runs in the background.
- Click Offline Processed ERAs or Offline Reports to view the processing status.
When the process completes, click the icon under Download/View to download a .zip file containing the report in .html format.
...
You can view reports that contain the details of ERA files processed by DrCloudEHR. You might want to view the report for a claim submitted for an encounter that the application is unable to reconcile.
- Click the Billing tab.
- Click ERA Process Report in the left-hand navigation menu.
- Enter your search criteria.
- Click Search. The details for processed ERA files loads in the table below.
- Click the plus symbol icon next to an ERA entry in the table to view a summary of the ERA data.

- Click the arrow icon in the ERA File column to download the original electronic data interchange file generated by the clearinghouse in .edi format.
- Click the icon in the Results column to load the contents of the electronic data interchange file in the window.

The results provide you with options for investigating issues in the payment, as well as methods for notifying others if any actions are needed.- Click the View Encounter Forms icon in the Invoice column to view the details for the encounter the payment is for.
- Click the Adjustments icon to view claim details in the Statement Manager, including any adjustments made.
You can update the claim details with any payments made and reconcile the claim. - If the provider needs to address the issue, click the Send Message icon to send the provider an email.
- To assign a task to the provider, click the Send Reminder icon.
...
- Click the Billing tab.
- Click Payments in the left-hand navigation menu.
- Click New Payment.
- Enter the payment details.

- Select Insurance Funding Source from the Paying Entity menu.
- Start typing the name of the insurance payer in payer in the Payment From field, and then select the payer from the popup list.
- Click Save and Allocate.
- Start typing the name of the patient for which you want to allocate payments in the Patient field, and then select the patient from the popup list.
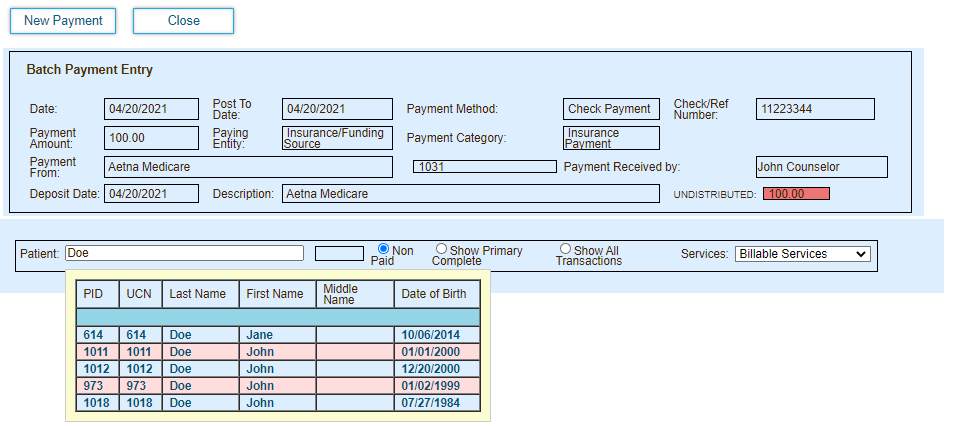
- For each service code shown, select the insurance payer in the Post For column:
- Ins1: Primary Insurance
- Ins2: Secondary insurance
- Ins3: Tertiary insurance
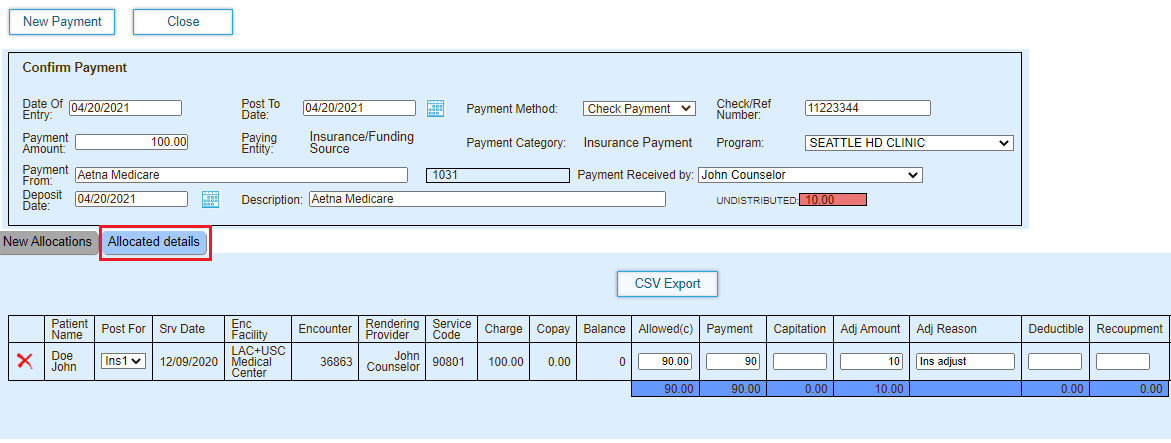
- Enter the payment and adjustment details for the service.

- Click Post Payments when you have allocated payments for all of the services listed for the patient.
- If multiple patients are included in the EOB, click Save and Allocate again, and repeat the process for the next patient.
...
- Click the Billing tab.
- Click Payments in the left-hand navigation menu.
- Click New Payment.
- Enter the payment details.
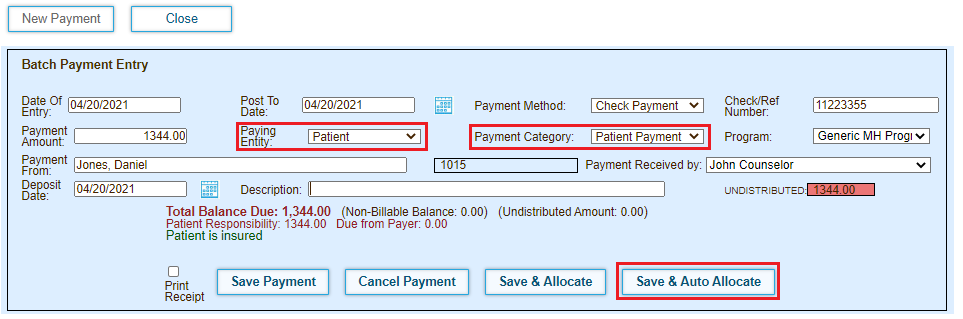
- Start typing the name of the patient for which you want to accept payments in the Patient field, and then select the patient from the popup list.
- Select one of the following options from the Paying Entity menu:
- Patient: Select for a full payment from the patient.
- Capitation: Select for a payment that makes up the difference between what insurance pays per a capitated contract, and the total amount due.
- CoPay: Select for a payment that is the patient's portion of the charge for a covered service.
- Select the payment type from the Payment Category menu.
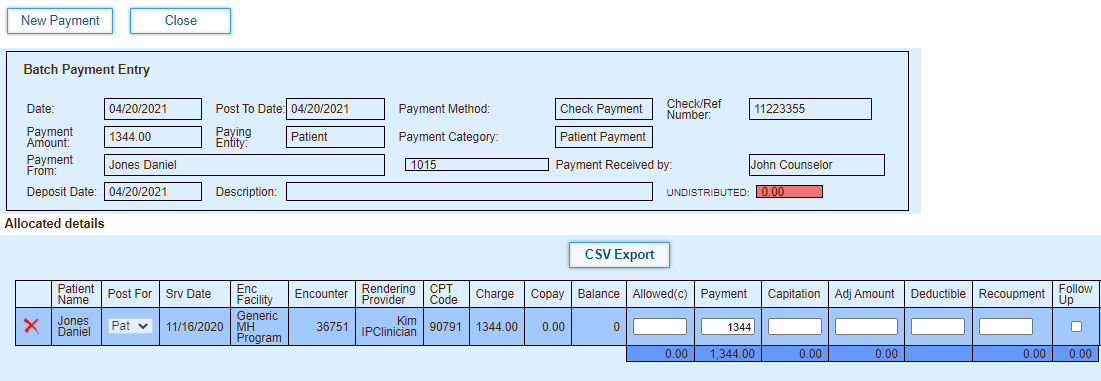
- Click Save & Auto Allocate. The page displays the payment details.
Overview
Content Tools
Activity